One of the main pillars of a standard financial model is flexibility, and one of the main characteristics of a great financial modeler is flexibility.
Let’s have a look at the meaning of flexibility in the dictionary. Flexibility means ‘capable of being flexed” or “characterized by a ready capability to adapt to new, different, or changing requirements.”
So financial model should be capable of adapting to different changes and requirements.
And another aspect of a good model is user-friendliness.
With the help of toggles and switches, you can allow your users to flex some of the base case assumptions easily with a click.

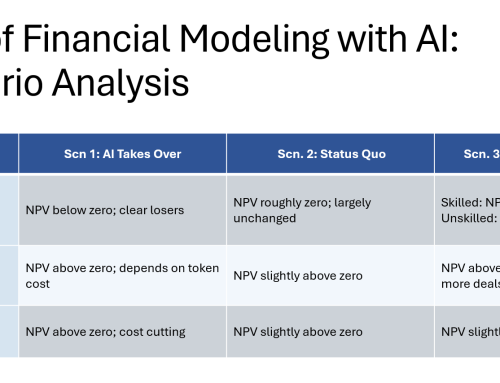
In this post, I will look at cases with binary options.
Step 1: Formulate the options that you think should be tested in the model.
Before submitting the model to your team or client, you want to consider things that need to be flexed at every project stage.
Here are a couple of examples:
- Is interest during construction paid or capitalized?
- Is interest subject to withholding tax?
- Is tariff escalated?
I will use the example of tariff escalation here.
Let’s say we are negotiating the purchase agreement and we want to test the impact of having a flat tariff or an escalated tariff.
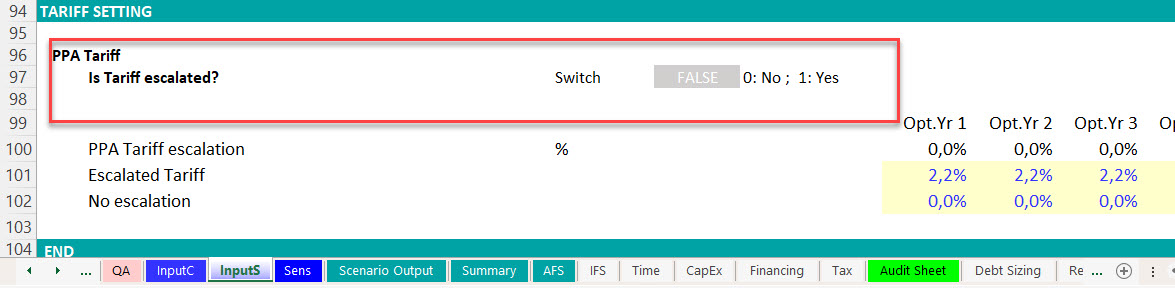
Step 2: Define the input
You must modify your inputs and include the switch in your input sheet.
In my tariff example, I want to define a time-based escalation rate and include the option to keep the tariff fixed so the escalation rate will be o.
Then I create a switch with 1 applying escalation and o for no escalation.
Step 3: Insert a checkbox using the developer tab.
If you don’t have the developer tab in your excel ribbon you can activate it by going to:
On the File tab, go to Options > Customize Ribbon. Under Customize the Ribbon and under Main Tabs, select the Developer check box
You can also change the text and formulate it to know what the switch represents.
Step 4: Link your input to the option button
Now you just need to right-click on the checkbox and establish the link. One thing to keep in mind is that you will most probably import this button to other sheets, so the cell address should contain the worksheet name. For this, you need to do what professor Bodmer calls the criss-cross or I call it zig zag. You need to click on the cell link under format control and then go to another sheet and come back to the sheet where you have the button and then click on the input cell.
Step 5: You then have to apply the switch in your calculation so that the switch can be activated.
Now you need to establish the link in your calculation. In my example, I have already calculated a tariff escalation index in my Revenue sheet, I just tweak the formula so that if this switch is set to false, the tariff is kept flat and if the switch is set to true then the tariff will be escalated.
Step 6: If you need to run any macro while changing the switch, then you can simply insert the macro that you want to run on the button.
Step 7: Import the button in your summary sheet or Dashboard.
You need to do this every time that you are preparing for a meeting so that you customize your summary/dashboard for the subject that will be discussed during that particular meeting.